
RGB Star Purchase
Here is a video on "Setting up a 16 CCR SuperStar Display" that shows how the star, drop-down piece, and mounting bracket attach to a mast.
This is an RGB Star for the top of your SuperStar display! Click here for a youtube video of the "Wizards in Winter" sequence on 16 CCRs with RGB star. To see other sequences made especially for the RGB star go to the Sequence Purchase page and look for the group titled "CCR Tree with RGB Star"
If you already have sequences that use the Legacy 6 channel star you can do the following and your RGB star will acquire white effects that match the 6 channel star sequencing:
If you are using S5
- Launch the S5 Sequencer
- Click on the "Sequence" menu and select "Preview Design"
- In Preview Design click on the "+Add Item" button and select "Superstar (online)"
- Select "CCR Tree - 16 strings with RGB pixel star"
- When the "Import Result" dialog box appears, just click on "Close"
- In "Preview Design" click on the "Save" button
- In any sequences that use this Preview you will now have the tree and RGB star. Expand the row labeled "Ribbons+RGB Star" and you should see a motion effect row labels "Effects SUPERSTAR"
- Right click on the "Effects SUPERSTAR" row and select "Select" and then selent "Row"
- Right click again on the "Effects SUPERSTAR" row and select "Insert SuperStar Effect"
- After a few seconds SuperStar will launch and you will see the 16 CCR Tree and RGB star
- Click on the "File" menu and select "Open" and open a sequence that has 6 channel star sequencing in it. You should get a message box that asks if you want to place a clip rectangle around the effects in the tree so the effects don't bleed over into the star region. Answer "Yes". Next you should get a message box saying "The star effects in this sequence have been converted to work with the star in the visualization" Play the sequence and you should see the white star effects on the RGB star
If you are using S4
- Right click here and select "save link as" for a visualization of the RGB star and place the file at: c:/ (your Light-O-Rama folder) / Visualizations / Editor / SuperStar_16CCRs_200PixelStar.lee launch SuperStar
- Launch SuperStar and open your sequence with 6 channel star sequencing
- Click on the "File" menu and select "Import Visualization"
- In the Import Visualization dialog box set the Sequencing Grid "Max Length" to 61
- Set "Vertical" and "Normal" and click on the OK button
- You should get a message box that asks if you want to place a clip rectangle around the effects in the tree so the effects don't bleed over into the star region. Answer "Yes" Next you should get a message box saying "The star effects in this sequence have been converted to work with the star in the visualization" Play the sequence and you should see the white star effects on the RGB star
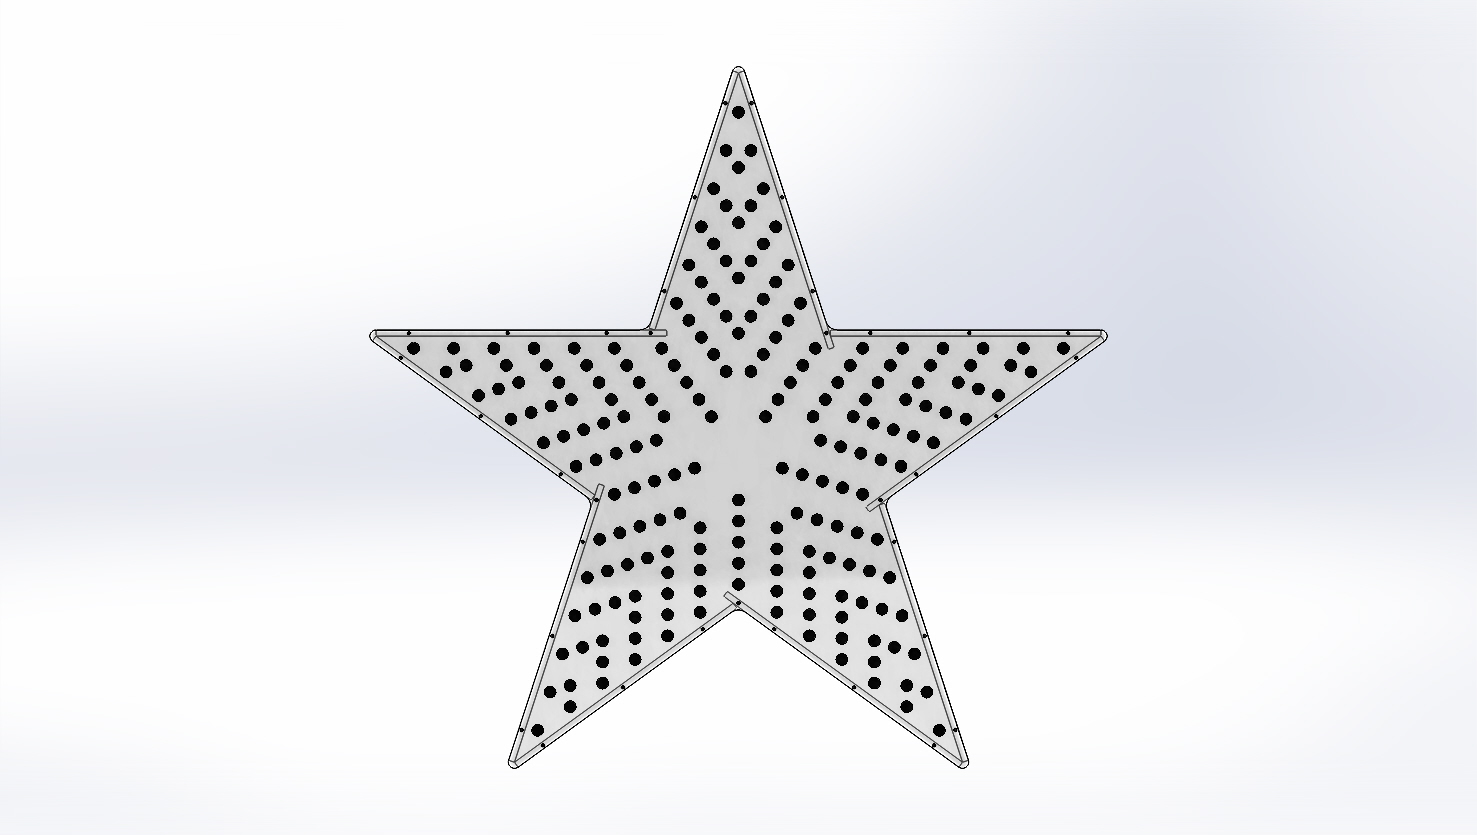
The front of the RGB star is made from 3/16" HDPE plastic. HDPE plastic is naturally UV resistant and will last at least 10 years in the sun.
The stars are cut using a CNC machine and the holes are cut by the CNC machine as well. Measuring from tip to tip the RGB stars are 30 3/16" which is the same size as the LED stars.
The RGB star has holes for 5 concentric stars and are designed for use with two sets of Cosmic Color Pixels for a total of 200 pixels.
The 5 concentric stars are made up of 20, 30, 40, 50, and 60 pixels.
The side pieces are 2" wide which is gives enough room in the interior of the star to accomodate the extra wiring resulting from the 200 pixels.
The kit includes:
- Star Front with 200 holes for 5 concentric stars (3/16" HDPE)
- Star Back (1/4" HDPE)
- 10 side pieces (2" wide 1/4" thick HDPE)
- Box of #6 1/2" Pan Head screws
The assembly of the RGB star is similar to that of the Legacy Star. Until I get instructions specifically for the RGB Star use the Legacy Star Kit Instructions PDF
The RGB Star uses 200 Cosmic Color Pixel lights that snap into the holes in the front of the star. You can use 4 strings of 50 pixels each, or 2 strings of 100 pixels each.
The following controller comes with 2 strings of 50 bullet pixels. So to get 4 strings of 50 bullet pixels you would buy two of the following: http://store.lightorama.com/ncccococoiiw.html
Or you can use 2 strings of 100 bullet pixels. To get 2 strings of 100 bullet pixels buy one of the following: http://store.lightorama.com/ncccococoiiw1.html
RGB Star Diagram (click picture to enlarge)

Assembled Star - Note that the kit does NOT include the pixels (click picture to enlarge)
| ITEM |
SHIPPING within USA |
PRICE |
| RGB Star (Does not include the RGB Pixels) | $35.00 | $99.95
|

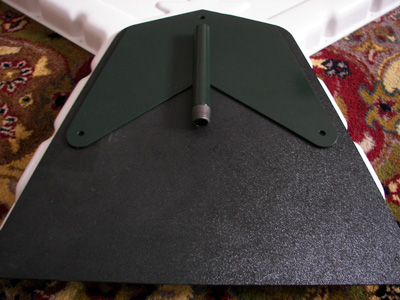
The drop down pieces will not have the holes pre-drilled, but instead will have 16 shallow pilot holes so you can drill the holes yourself.
You can drill holes whatever size suits your needs, and if you want you can drill the holes straight across or where ever you want. Also, you can drill 16 holes if you want. The drop down piece is made of a strong plastic but it is not acrylic, so you can use a regular drill bit to drill the holes.
| ITEM |
SHIPPING | PRICE |
| Drop Down Piece | $15.00 | $39.95 |
| Star Mounting Bracket | $15.00 | $39.95 |
![]()
RGB Star Pixel Positions - Front View
![]()
RGB Star Pixel Positions - Back View